Graphics, Part V: Fireworks,
Continued
Creating Buttons
It seems like
every Web page has some icons or buttons on it--especially for navigating
around the site. Here's how to create your own in Fireworks.
- Create a new Fireworks document, 160 x 100 pixels with a custom,
black Canvas Color--as in this New Document window.

- Save your button-to-be in the Fireworks format as button.png on the Desktop.
- As you work, you'll need several tools from the Fireworks Toolbox. You may
want to refer to this explanatory
guide to the Toolbox (clicking
here will open it in a new window so you may refer to it later). This
guide is for version 2 of Fireworks and we're using version 3, but there are
only one or two differences.
- Select the Rectangle Tool
 from the Toolbox. Make sure you've selected
and not the Hotspot Tool
from the Toolbox. Make sure you've selected
and not the Hotspot Tool  or Slice Tool
  .
They're very easy to confuse!
.
They're very easy to confuse!
- Go to the Fill Color (beneath the Toolbox) and pick a nice
red--although it really doesn't matter.
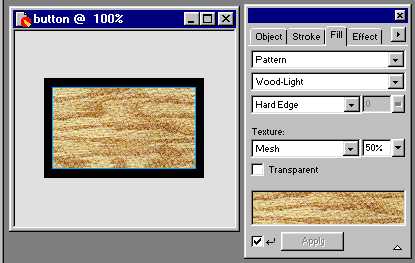
- Go to the Fill Panel (you may need to open it from the Window
menu) and mess around with your rectangle's pattern and texture. I selected
a Pattern of Wood-Light and set the Texture to Mesh
(with Amount of Texture at 50%--medium strong), but you can do anything
you want with your Fill!
- Add some text by choosing the Text Tool and dragging a rectangle
over most of the image. This will create a Text Box in your image and
open the Text Editor:
I've here selected Georgia font and 32 pt. letters. Be certain the rest of
the settings are at their defaults or you can get some very funky and unexpected
text effects.
All of the examples
here use my U. Arizona class (MAR 203). You can use that, too, but it wouldn't
make much sense.
- I could Export this as a button now and it would be . . . well .
. . okay, I guess.

But we can spice it up considerably!
- First, if you don't like the black background (and I don't), then, before
exporting, go to the Modify menu and select Document. Then select
Trim Canvas. Good-bye black canvas background.

- Now! Click once on the rectangle (of wood, in my case). A small blue line
appears around it. Open the Effect Panel, if it isn't already. If you
choose an Effect Category (the top blank) of Inner Bevel and
set the other options as below, you'll wind up with a nicely bevelled button!

- And effects are not limited to background fills. Highlight the text ("mar
203") on the button. Click once and a blue rectangle appears around it.
Have you noticed that when you roll the pointer over something like a piece
of text that a red rectangle appears around it and that when you click
on it, it turns blue? Isn't that handy?
- Go to the Effect Panel and adjust the settings as below.

Sweet!
- Save your finished button as button.png.
- Export it as a JPEG or GIF and you're done! (I chose JPEG because of the
varieties of color in my background fill. A GIF would work better if the background
were all one color.)

Button, Button, Who's Got
the Button?
Yep, there's still
more you can do with buttons! Let's get to it . .
.
Bibliography
- Sandee Cohen, Fireworks 2 for Windows and Macintosh (Berkeley: Peachpit,
1999). A Visual Quickstart Guide.
Last revised: May 29, 2000 8:19 PM
Comments: jbutler@ua.edu
;)