Graphics, Part IV: More
About GIFs
Interlaced Images
You may have noticed
the Interlaced choice in the Export Preview window near Transparency.
Interlaced GIFs display one part at a time, much like the opening of a venetian
blind. This helps hold user interest while they wait for a slow download.
It's hard to see
the effect when the page loads quickly. So try this
link to the U. of Arizona and watch how the beetle displays.
Try it out
yourself!
- Save the class photo JPEG to the Desktop as tcf389.jpg.
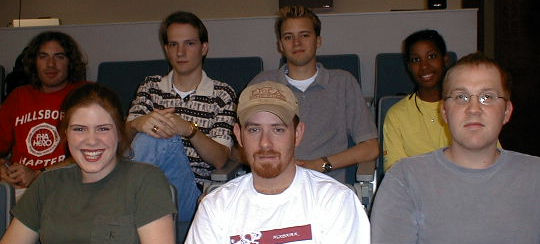
- Open it in Fireworks.
- Go to Export Preview and change it to a GIF with the Interlaced box
(lower left corner) checked. Export it to the Desktop as tcf389.gif.
- Use Dreamweaver to create a Web page for it. Insert tcf389.gif into it and
save it to the Desktop as interlace.htm.
- Use WS_FTP to put interlace.htm (and tcf389.gif) in your bama.ua.edu account.
- Use a browser to access interlace.htm on bama.ua.edu. Can you see the interlacing
effect? Or does the image load too quickly?
- Show it to your instructor.
Transparent Images
- Often you need to have an image appear to float over your Website's background--like
this beetle.
- To do so, you need to make part of the image "transparent." This only
works with GIF files (not JPEG).
- Traditional graphics editors (like Adobe Photoshop) handled this quite
poorly.
- Many Web designers use other graphics software for this task
- E.g., Macromedia Fireworks and Adobe ImageReady (which is now bundled
with Photoshop).
Transparent GIFs in Fireworks:
Step-By-Step
- Save this image of Bart Simpson on the Desktop as bartpurple.gif.

- Start Fireworks.
- Load bartpurple.gif into it.
- Go to the File Menu and select Export Preview (this also works
in 2-Up and 4-Up, if you prefer).
- Note the Transparency setting near the lower left corner. In the
illustration above, it's set to No Transparency. Clicking on that box
gives you two choices:
- Index transparency--works on GIFs. Choose this.
- Alpha transparency--does not work on GIFs.
- You may now pick which color in your image will be transparent by using
the Transparency Eyedropper Tool
 .
Once you activate it by clicking on it, you may then click on a color
in the image itself. Whatever color is clicked on will become transparent.
Click anywhere on the purple behind Bart.
.
Once you activate it by clicking on it, you may then click on a color
in the image itself. Whatever color is clicked on will become transparent.
Click anywhere on the purple behind Bart.
(A palette showing all the colors in the image is displayed, too. You can
also use the eyedropper to select from there.)
- The purple part should turn into a checkerboard pattern. This designates
"transparency."
- Select "Export" and export it to the Desktop as barttrans01.gif.
- Then do two more bart.gif's--with two different color transparencies. Save
them on the Desktop with different names.
- Create a test Web page in Dreamweaver. Save it as transtest.htm on the Desktop.
- Set the background color to something distinctive, then insert all your
bart.gif's into it.
- Load it in your browser, and show it to your instructor.
The
Anti-Aliasing Issue
- Anti-aliased images cause problems for transparent GIFs--as can
be seen in the white clutter around the edge
of our beetle.
- Weinman explains the problem in detail (pp. 210-17). See also Niederst,
pp. 269-71.
- DEMO: PSantialias.gif. Here
is an anti-aliased image:

Anti-aliasing makes the edges softer--as can be seen in this enlarged
detail from the guitar's body:

The "softening" is achieved, in this case, by pixels in various
shades of gray in between the pure black and pure white ones. This causes
trouble for transparent GIFs because just one color is turned transparent.
In this example, we can turn the white transparent

but the gray pixels in between the white and black ones are not turned
transparent and show up as little nubs around the edges of the image.
- Thus, transparent
GIFs work best if the edges are hard ones, or aliased (one might
say), before the transparency is set.
- This may be done in Photoshop by changing the image's "mode."
(
 Further
details here.)
Further
details here.)
- In Fireworks, there is no equivalent to mode setting, but there is a
way around this.
- Before setting the transparency color, use the Paintbucket
tool
 to fill in the area you want to make transparent.
- Use a unique color that does not appear elsewhere in the image and
. . .
- Choose Hard from the Edge options in the Fill
panel (below). This part is crucial! The hard edge option minimizes
anti-aliasing.
- Then, while exporting, make this unique color transparent. Using
this technique, we may turn our guitar image
into a better-looking

Although it still isn't perfect; it is much improved.
Try it
yourself:
- Use Fireworks to make
the anti-aliased image, PSantialias.gif, into a transparent GIF;
- Use Dreamweaver to create
a new Web page with a colored background and save it to the desktop as transtest.htm.
- Insert the anti-aliased
PSantialias.gif into it.
- Next, convert PSantialias.gif
into an image with hard edges in Fireworks using the technique described
above.
- Save it as PSalias.gif.
- Put it in the same Web
page. Can you see the difference? Show it to your instructor.
Transparent
GIFs from a Photographic Original
Using a photograph
for your transparent GIF can be tricky because of the ill-defined edges in a
photograph.
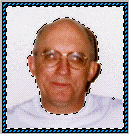
- Begin by scanning an image into Fireworks. E.g., this dorky one of me sitting
on the World's Ugliest Couch.
- Select the Lasso Tool
 from the Fireworks toolbox. What do all those tool icons mean? Find the answers
in this visual guide to the
Toolbox.
from the Fireworks toolbox. What do all those tool icons mean? Find the answers
in this visual guide to the
Toolbox.
- The Lasso Tool will allow you to trace an outline around the part of
the image you wish to use.
- Important
Note: Be certain to check the Lasso's Tool Options. (You
may need to check Tool Options in the Window Menu in order
to see the options palette--as below. Double-clicking
will also display the options palette.) Instead of being set to Anti-Alias
(which is its default) it must be set to Hard Edge.

- So, trace (drag the cursor) an outline of the part of the image you wish
to use.
- Use the View Menu to zoom in on your image
- It's best to use a drawing pad instead of a mouse for this, as the primitive
results below show.

- My head is now selected (as the marching ants indicate), but actually I
want to select everything but my head.
- To do so, go to the Edit Menu and choose Select Inverse. This
selects the inverse of what had been originally selected. Note how the marching
ants change location!
- An alternative
to the lasso tool is the magic wand tool
 .
.
- Lets you select portions of an image based on the color similarities
of neighboring pixels. This tool can be useful for selecting a consistently
colored area (for example, a red flower) without having to trace the
outline with the lasso tool.
- To use the Magic Wand:
- It lives in the same place as the Lasso on the Toolbox. If it
is not displayed, then click on the Lasso button, hold it down momentarily.
The Magic Wand button will appear. Click once on it to activate
it.
- Double-click
to display its Options palette, which is very similar to the Lasso
options above.
- For Tolerance, enter a value in pixels. The tolerance can
range from 0 to 255. Enter a low tolerance value to select
colors very similar in color value to the pixel you click. Enter
a higher tolerance to select a broader range of colors. For
example,
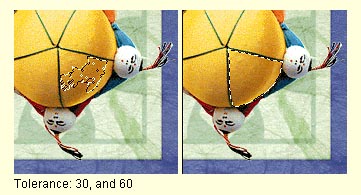
- Make sure the options are set to Hard Edge and not Anti-Alias.
- In the image, click the color you want to select. All adjacent
pixels within the tolerance range are selected. In the shot of me
on the couch, I set the Magic Wand to a tolerance of 90 and clicked
on the white area near my head--with the following result:
The "marching ants" outline around my head and the image
frame indicate that that area (everything but my head) is
now selected. Thus, with the Magic Wand I do not need to use Select
Inverse.
- I now turn everything but my head a distinct purple (a color I know
doesn't exist in the image naturally):
- Select the Paintbucket tool.
- Set the Paintbucket Tool color to purple:
- To fill a selection with the Paintbucket (rather than similar colors
as the Paintbucket Tool normally does), check Fill Selection Only
on the Paintbucket Tool Options panel:

And, of course, make sure Edge is set to Hard!
- Click on the selected part of the image (that is, outside my head).
My head now floats in a field of purple:

- Turn off the selection by going to the Edit menu and choosing Deselect
(or using the shortcut of CTL-D).
- Export the image as a GIF file and turn the purple portion transparent
(as explained above). Et voila! A floating Jeremy head!

Bibliography
- Lynda Weinman, Designing Web Graphics .3 (Indianapolis, IN: 1999).
- Jennifer Niederst, Web Design in a Nutshell (Cambridge, MA: O'Reilley,
1999).
Last revised: May 29, 2000 11:19 AM
Comments: jbutler@ua.edu
;)