Graphics, Part IV: Transparent
GIFs
Transparent Images
-
Often you need to have an image appear to float over your Website's
background--like this beetle.
-
To do so, you need to make part of the image "transparent." This only
works with GIF files (not JPEG).
-
Note: And you must use GIF89a format and not GIF87a. (89a was announced
in 1989 and 87a in 1987.) Also, transparency does not affect file
size.
-
Until recently, Photoshop handled this quite poorly and required a plug-in
(see Weinman, pp. 178-79).
-
Many Web designers used other graphics software for this task
-
E.g., DeBabelizer (Mac, expensive) and LView (Windows)
-
Photoshop Version 4, however, is a bit smarter about it.
Transparent GIFs in Photoshop:
Step-By-Step
-
Even though "CompuServe GIF" is a choice in Photoshop's "Save As" dialog
box, you cannot create a transparent GIF this way!
Instead, you must go to the File Menu and select Export and
then GIF89a Export...
-
With the
 eyedropper tool selected (as above), click on the area that you want to be
transparent. This selects the color of that area to be transparent. Photoshop
indicates this by turning that color gray (as above).
eyedropper tool selected (as above), click on the area that you want to be
transparent. This selects the color of that area to be transparent. Photoshop
indicates this by turning that color gray (as above).
(A palette showing all the colors in the image is displayed, too. You can
also use the eyedropper to select from there.)
-
Select "OK" and you're done!

The Anti-aliasing Issue
-
Anti-aliased images cause problems for transparent GIFs--e.g., the
white clutter around the edge of our beetle.
-
Weinman explains the problem in detail (pp. 172-4)
-
DEMO: PSantialias.gif. Look closely
at the edges

-
Images must be aliased before being made transparent.
-
In Photoshop, select the Image Menu, then Mode and change the
image to Bitmap:
-
Select the 50% Threshold Method--which equalizes all the grays,
resulting in a black-and-white aliased image.
Exercise: Create an aliased image using the
antialiased image, PSantialias.gif; then insert it into a Web page
with a colored background.
Transparent GIFs from a
Photographic Original
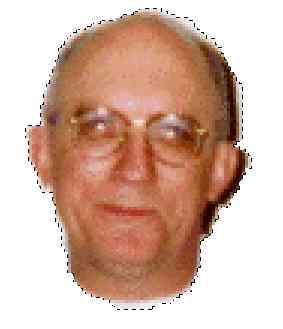
Using a Photograph for your
transparent GIF can be tricky because of the ill-defined edges in a photograph. Lynda Weinman explains, step-by-step, how to get around that problem in Photoshop.
- Begin, naturally, by scanning an image such as this dorky one of me sitting
on the World's Ugliest Couch.
- Prepare to use it as a GIF by converting the Image Mode to Indexed
Color. Then save it as a Compuserve GIF file.
- Select the Lasso Tool
 from the toolbar.
- The Lasso Tool will allow you to trace an outline around the part of
the image you wish to use.
- Important Note: Be certain to check the Lasso Tool's options.
(You may need to check Show Options in the Window Menu in
order to see the options palette--as below. Double-clicking
will also display the options palette.) The Anti-Aliased box must
be unchecked.
- So, trace (drag the cursor) an outline of the part of the image you wish
to use.
- Use the View Menu to zoom in on your image
- It's best to use a drawing pad instead of a mouse for this, as the primitive
results below show.

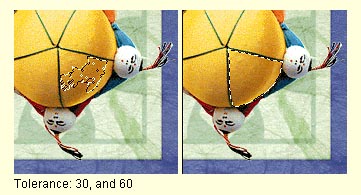
- An alternative to the lasso tool is the magic wand tool
 .
.
- Lets you select portions of an image based on the color similarities
of neighboring pixels. This tool can be useful for selecting a consistently
colored area (for example, a red flower) without having to trace the
outline with the lasso tool.
- To use the magic wand:
- Double-click
to display its Options palette, which is very similar to the Lasso
options above.
- For Tolerance, enter a value in pixels. The tolerance can range
from 0 to 255. Enter a low tolerance value to select colors very
similar in color value to the pixel you click. Enter a higher tolerance
to select a broader range of colors.
- Deselect Anti-aliased.
- To select colors using data from all the visible layers, select
Sample Merged. If you leave Sample Merged deselected, the magic
wand tool only selects colors from the active layer.
- In the image, click the color you want to select. All adjacent
pixels within the tolerance range are selected.
- My big head is now selected, but actually I want to select everything but
my head so that I can manipulate it. To do this, I must invert the selection
by going to the Select Menu and choosing Inverse. It looks the
same, but now everything but my head is selected.
- I now turn everything but my head white (although other colors could
be used) by
- Making sure the Foreground Color is set to white.
- Choosing the Edit Menu, then Fill; then setting Contents
to Foreground Color and Opacity to 100%. My head
now floats in a field of white.
- Turn off the selection by going to the Select Menu and choosing None.
- Export the image as a GIF file and turn the white portion
transparent (as explained above). Voila!

Bibliography
Lynda Weinman, Designing Web Graphics .2 (Indianapolis, IN: 1996), 166-87.
Last revised:
July 19, 1999
Comments: jbutler@ua.edu