TCF389: Graphics, Part I
Optimizing Images for the Web
Or, Low-Bandwidth Graphics
The Web requires the smallest files possible in order to minimize the time
it takes a page to display
-
As files get smaller, the quality of the image tends to worsen, but
this is not always true!
-
And so Web designers often have to balance the quality of the image against
its size
-
Three factors affect the size of image files
-
The physical size of the image, measured in pixels
-
The number of colors contained in the image (its bit depth)
-
The format of the file (GIF, JPEG, and, PNG)
Pixels, Pixels, Pixels: Resolution
-
Screen is made up of little dots of light, or pixels
-
Image is created by electron gun zapping them and turning them a certain
color
-
Three phosphor dots (red, green, blue--or RGB) create one colored
pixel
-
Monitor resolution is rated in terms of the maximum number of pixels
it is capable of fitting on the screen.
-
Some standard resolutions, measured in height by width, are:
-
640x480
-
De facto standard for Web
-
800x600
-
1024x768
-
Even though this is maximum, you can set your screen to a lower
resolution--which is useful in Web design
-
Demonstration: As can be done in Windows95
Change resolution from 800x600 to 640x480 (or vice versa)
-
How many pixels in an inch then?
-
At the standard of 640x480, there are 72 pixels (or dots) per inch
(dpi)
-
E.g., same image at different resolutions is physically a different size
-
Demonstrate with Screen Ruler
utility
-
This is a key number to remember!
-
Images created/scanned at 72 dpi will be about the same size as the real
thing!
-
Ways to change image size
-
HTML's width/height attribute of <IMG> tag
-
Regardless of original size, you can manually set a size (as was explained
in the first tutorial, Lesson Three--with copper.gif)
-
Sometimes useful when taking a small file and make it look large--but
it often winds up distorting the original:
 (82x68)
becomes
at 200x200
(82x68)
becomes
at 200x200
-
And the pixels become really obvious
-
Making a large image smaller can occasionally be useful
-
But usually it's not a good idea because the file will still take a long
time to download--which defeats the purpose.
-
Image editor such as Photoshop
-
Fairly simple: Image Menu, then Image Size
 .
.
-
Change Width/Height in Pixel Dimensions, by percent or actual pixel
number--keeping the 640x480 standard in mind
-
Ignore Print [on paper] Size except for Resolution,
which must be 72 dpi.
-
Choose to Contrain Proportions, usually.
-
Keeps the proportion of width to height the same
-
Maintains the aspect ratio of the image
-
How do you know the real size of your files?? (see Weinman,
p. 74)
-
Win3/95: File Manager/Windows Explorer shows you fairly accurate size
-
Use F5 to refresh the list
-
Mac: listing in folders is innacurately rounded
-
E.g., listing with graphic files in it
-
Only way to know true size is the Get Info command
-
Highlight the file you want to check, go to File Menu, choose Get
Info
-
Keyboard shortcut: COMMAND-I
EXERCISE: shrink a picture and check
file size
Bit Depth: I.e., Numbers of Colors
-
Bit depth = how many binary digits are used to create
color; 2 to the power of x
-
2 colors = 1-bit
-
Black and green/amber/white in monochrome displays
-
16 colors = 4-bit (2x2x2x2)
-
Old standard, especially for Windows 3 machines
-
256 colors = 8-bit
-
Current standard for the Web
-
65,500 (64k) colors = 16-bit
-
Often just referred to as "thousands of colors" or "high color" (Windows95)
-
16,700,000 colors = 24-bit
-
Or, "millions of colors" or "true color" (Win95)
-
Monitors are rated in terms of the maximum number of colors
they are capable of displaying
-
Images themselves are comprised of a specific number of colors
-
And thus, they too, have a bit depth
-
If you try to view an image on a monitor that supports a lower number of
colors than are contained in the image, it will look crummy
-
E.g., if there are millions of colors in an image and you view it on a monitor
that can only show you 16 of them, it won't look so hot.
-
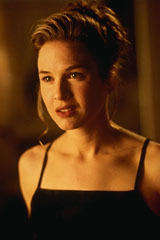
DEMO: Crank notebook down to 16 colors
and display renee.jpg, a 24-bit, 16.7mil, "True Color" image
-
The more color information, the larger the file (usually), so how do you
reduce bit depth?
-
DEMO: LView color depth reduction
-
Which is much easier than Photoshop's!
-
Reducing bit depth (numbers of colors) in Photoshop (see Weinman,
p. 110)
-
Select Mode Menu, from the Image Menu:
-

Three most important modes are
-
Grayscale (monochrome, "black and white")
-
Indexed Color...
-
RGB Color
-
Only the Indexed Color mode allows you to adjust number of colors in
Photoshop!
-
Less than convenient; which is why many people use another image processor
(e.g., LView or DeBabelizer) to reduce color depth
-
DEMO: Photoshop method
-
Normally, you'll start (say, from a scanned image) in RGB Mode
-
Change it to Indexed Color to reduce the bit depth
-
Indexed Color dialogue box pops up
-
Palette: set to Adaptive (see Weinman, pp. 50-51).
-
Palette, as in a painter's palette, is the specific colors that are contained
in an image. DEMO: show Photoshop
pallette.
-
Adaptive Palette, in the conversion from RGB to Indexed Color, means that
Photoshop will take colors from the original image itself and do its best
to match them and will not bring in new colors.
-
Color Depth: (key setting), set as low as possible while maintaining
sufficient quality
-
Colors: set automatically when you pick the depth or choose
Other for Color Depth and then enter a specific number of colors
-
Options/Dither: difficult issue
-
"the positioning of different colored pixels within an image that uses a
256-color palette to simulate a color that does not exist in the palette."
-- Lynda Weinman
-
Generally, images with subtle gradations should be dithered and images
with solid color should not.
Exercise: Take the 256-color image below, reduce
its bit depth, and then check the file sizes (keep it in GIF format).
File Formats
-
Almost all images on the Web are either in the GIF (pronounced "jiff" or
"giff") or JPEG (pronounced "jay-peg") format
-
GIF = "Graphic Interchange Format"
-
JPEG = "Joint Photographic Experts Group"
-
Which makes smaller files?
| GIF |
JPEG |
| cartoon-like images |
photographic images |
| solid fields of color |
subtly gradated colors |
| 256 colors maximum: requires Indexed Mode |
unlimited # of colors: requires RGB Mode |
| transparency |
nope |
| interlacing |
"progressive" JPEG |
| animation (GIF89a): discussed on Thursday |
nope |
| fixed lossless compression (Weinman, p. 48) |
user chooses amount of compression (Weinman, p. 58) |
Compressing JPEG: Step-by-Step
-
JPEG options in Photoshop and LView use different terminology for the same
effects. Here are the "JPEG options" dialog boxes for both apps (Photoshop
is on the left):
-
Photoshop: Setting a smaller "Quality" number makes for a smaller
file and a poorer image. Your choices are 0-10.
LView: Setting a smaller "Compression Quality Factor" does the same
thing. Your choices are 0-100.
-
Here's an example of "0" and "10" Quality settings
in Photoshop. See also, Weinman's examples (p. 58).
GIF vs JPEG examples
-
See Weinman's many examples (especially p. 56 for JPEG and GIF comparison;
and pp. 88-109)
-
Cartoon-like image
-
Photographic image
Exercise: change a GIF to JPEG and a JPEG to
GIF, then compare file sizes
-
TracerouteWhitehouse.gif
-
renee.jpg
References
Lynda Weinman, Designing Web Graphics.2 (Indianapolis, IN: New Riders
Publishing, 1996). Available at a discount from
www.amazon.com, online bookstore. The
best and most comprehensive book on creating images specifically for the
Web.